04 December 2010

Time Flies!

I can't believe it's been almost a month since my last post - but it is snowing outside right now, which reminded me that fall has gone, and winter has arrived.
I've been busy with classes - this upcoming week is final exams! - but I've still made time for exploring Chicago and baking, of course. Last night we celebrated my friend's birthday with macaroni and cheese and a chocolate-caramel-peanut tart.
The other day I made upside-down banana chocolate cake with peanut butter frosting (one in a cute cupcake mold my roommate got as a birthday present - her present from me was a batch of chocolate raspberry cupcakes with raspberry frosting).
For Thanksgiving I went all out for the dorm potluck: cranberry apple pie, mini pecan pies, two casserole pans of vegetarian stuffing, and roasted Brussels sprouts. It ended up being a great holiday; after an entire day of cooking in a friend's dorm (I was having oven issues), my dormmates gathered in our lounge for a delicious and bountiful spread, then watched movies together until 4 a.m.!

I've had some great downtown excursions lately! On Thursday, I went with a friend's dorm to see a show at Second City, Chicago's famous comedy club - it was great fun. And a couple of weeks ago, I visited another of Chicago's famous attractions: the Navy Pier ferris wheel!
It's about 11 stories high, and was my first time ever on a Ferris Wheel. I enjoyed it - it will not be my last! After Navy Pier, we went to a swing dance in a Northernly neighborhood called Andersonville, and made a couple new friends and learned a few new moves. Hopefully I'll be able to go to a couple of dances and practice lindy hop over Christmas break!

08 November 2010

Busy!

The capitol at night.

Chili!

We only saw about 20 minutes of the rally because there was a 2 hour line for metro tickets and we had camped overnight in Maryland...


Chocolate gingerbread salted caramel cake for my friend's birthday...

Hello - I apologize for the severe lack of posts! Not only have I been busy exploring Chicago, but I've also been exploring the country; two weekends ago I took a road trip with 6 new friends to Washington, D.C. for the Jon Stewart Rally to Restore Sanity - or rather, we used that as an excuse to spend a weekend together driving across the country! It was a great time and seeing the capital again was really fun.
I've been busy cooking, salsa and swing dancing, and of course with schoolwork - I had an essay (on the co-evolution of orchids and orchid bees) for biology due last week and a test today, a Language and the Human paper (on bilingual education in the United States) due today, and math homework and Alfarabi readings for Classics of Social and Political Thought - so much to do and so little time!

15 October 2010

Almost Midterms

A view of downtown Chicago from the 96th floor of the John Hancock Building, where there was a reception for first-years during O-week.

The first quarter is just flying by, and we have just finished "third week". Already I'm getting busy: I had a paper due for Core Biology today. Our topics had to relate to genes, so I chose the genetics of longevity - proving that in order to live to be a centenarian or a supercentenarian (more than 110 years old), one must have the correct genetic makeup. I found a bunch of great evidence, so the essay came together well. A draft of a paper for Language and the Human is due Monday, plus a math test next Friday, and a Classics of Social and Political Thought paper due next week as well - in other words, I should probably start spending a lot more time doing work than I have been!
There are so many legitimate distractions: cooking and hanging out with friends, swing dancing, going downtown - and since photos of these are much more exciting then me doing homework, I've uploaded a few.
Caramel Apple Cupcakes

Our tiny kitchen - the tiny oven is on the left. The middle door does not stay shut.

Chocolate Pomegranate Mousse Cake
A lot of buildings on campus are neogothic...including the chapel, which is basically a cathedral. Makes me think of Spain often!!

28 September 2010

Classes!

I'm still alive, but between College Night at the Museum of Science and Industry, free gelato at Istria, student group information meetings, movies in the dorm lounge, speakers, community service, a trip to Wicker Park, my vibraphone audition, and, finally, classes, I've been really busy! My schedule has shaped up to be full of required core classes: core bio, calculus, Language and the Human (a humanities course), and Classics of Social and Political Thought (beginning with Plato's Republic!). Life in Chicago is so far, so good.

18 September 2010

UChicago

I'm in Chicago!! Move-in starts tomorrow. :-)

14 September 2010

Bread Pudding Tiramisu

Fall calls for warming, spiced desserts, like this tiramisu bread pudding. The bread pudding itself is soaked with coffee, chocolate, and rum, then sliced and topped with a thick rum mascarpone cream. I better to able to find some cooking alcohol in college, because this dish will definitely be made again. It isn't overly sweet, which is nice - the bittersweet elements of chocolate and coffee really shine.
Tiramisu Bread Pudding

6 oz egg or milk bread, such as challah, brioche, or Portuguese rolls
1 cup whole milk (I ended up using soymilk and it turned out wonderfully. However, these are definitely not vegan!)
5/8 cup heavy cream
1/4 cup very strong brewed coffee, cold
3 Tbsp rum
2 smallish eggs
2 yolks (remember those macarons? and all the yolks left over?)
1/4 cup sugar
3 oz bittersweet chocolate

1. Cut bread into 1-inch cubes and place in an 8x8 pan. If your bread isn't already stale, bake for 10 minutes at 350ºF.
2. Meanwhile, bring milk and cream just to a boil. Have water boil on another burner, but turn it off once it boils - this will be for the "bain marie", the water bath.
3. While the milk and cream are on the stove, whisk the eggs, yolks, coffee, rum, and sugar.
4. Slowly whisk scalded milk into the egg mixture, drizzling in about 1/4 of it first while whisking - you don't want the eggs to cook! Continue whisking while drizzling in the remainder. Add chocolate and whisk until melted.
5. Pour over bread in the 8x8 pan and let soak for 30 minutes, pushing bread down with the back of a spoon as necessary.
6. Preheat your oven to 350ºF. Put the baking pan with the bread pudding into a large roasting pan lined with paper towels. Place in the oven and then pour water into the large pan to halfway up the 8x8 pan. Bake 35 to 45 minutes, until puffed and an inserted knife comes out clean.
7. Let cool while you prepare the:
Mascarpone Cream
2 Tbsp rum
3 yolks
1/3 cup sugar
1/8 tsp salt
8 oz mascarpone
3/8 cup heavy cream

1. Whip heavy cream. Set aside.
2. In a heatproof bowl over a pan of simmering water (don't let the bowl touch the water), beat yolks at a low speed with an electric hand mixer until combined.
3. Add sugar and salt and beat at medium high until pale yellow and foamy. Add rum and continue beating.
4. Remove from heat and beat in mascarpone until well combined.
5. Fold into whip cream and chill.

If feeling ambicious, you can slice the bread pudding (once cool) and layer the whole thing into a more traditional looking tiramisu. But if you are impatient, it is just as good with a slightly warm piece of bread pudding with a generous dollop of cream on top...and a sprinkling of cinnamon or cocoa powder for the finishing touch.

13 September 2010

Red Cabbage Tarts with Balsamic Apple Compote

After seeing the photo on Tastespotting, as often happens, I decided that I just had to make these tartlettes. The head of cabbage begging to be used in the fridge encouraged the decision and I headed to the kitchen. The dough was a dream to work with - I'll definitely use it for any tart or pie in the future. At first bite, the tarts were a bit dry alone...but with too little balsamic vinegar left to make enough reduction, balsamic-glazed apples did the trick, packing another great fall flavor into these already wonderful savory galettes.


Red Cabbage Tarts
Tart dough:
2 1/2 cups flour
1 tsp salt
1 tsp thyme
1/2 lb butter
1/2 cup ice water

Tart filling:
2 tbsp olive oil
3/4 cup water
1 red onion
1/2 small head of red cabbage, cored
2 tbsp vinegar
2 tbsp sugar
2 tbsp thyme
1 1/2 tsp salt
1/2 tsp pepper
1 tsp cumin

1. For the dough, combine flour, salt, and thyme in electric stand mixer. Add butter and beat to a crumb or sand texture. Add water, combine until dough comes together, and transfer to saran wrap. Chill in fridge.
2. Meanwhile, heat olive oil over medium heat. Slice onion and cook until soft. Add sliced cabbage along with the water. Add the remaining ingredients and cover.
3. Cook covered for 10 minutes. Uncover and cook until the liquid is gone, adding more water if the cabbage is still crunchy.
4. Remove the dough from fridge. Divide into 9-12 parts and roll into 6-inch circles. Transfer to lightly greased baking sheet. Place a large spoonful of filling in center and fold edges up.
5. Bake at 350ºF for 30 to 35 minutes.

Balsamic Apple Compote
1 apple per tart
1 tsp butter
1/2 tsp thyme per apple
2 tsp balsamic vinegar per apple
1/2 tsp sugar per apple
1/2 cup water

1. Melt butter over medium heat. Add thinly sliced apple and thyme. Cook for a few minutes.
2. Add remaining ingredients. Simmer apples for 10 minutes, turning once, until liquid is gone and apples are soft but still hold their shape.
3. Spoon apples over hot tart and enjoy!

11 September 2010

i heart macarons

Almondy times chocolatey plus Baileys ganache equals the best macarons I have ever made.
Okay, they are the first macarons I've ever made. "Conquering" the quintessential cute French sandwich cookie has been on my list of things to do in life for a while, and I finally had a day and a morning of leisure. So along with some delicious red cabbage tarts (post coming soon!) I decided to try macarons.
The macaron has three essential parts: the shiny meringue-y shell, the rough "feet", and the filling. To achieve the "shell", a traditional macaron recipe calls for resting on the cookie tray for 30 minutes. A traditional recipe also calls for aged egg whites, and I didn't think that far ahead, so my recipe didn't specify the wait - but I let them sit out for a little while anyhow. And since I got the shiny smooth tops, I don't think it hurt. The feet don't appear until after a bit of baking; the cookie raises up its top and peeks out from underneath. I was overjoyed when I peered into the oven and saw them! My filling was a bit thin (too much cream) but made up for it in its deliciousness...I like to take these babies apart and add some more ganache right before consumption.
One problem I had was a dearth of parchment paper...so I sprayed some oil onto the pans and crossed my fingers. The first tray was very grounded - those little feet just did not want to come off the cookie sheet! However I got to the second tray faster and only cracked a couple. And cracks are simply an aesthetic flaw...they still taste great.
I used a scale to weigh out the ingredients, just to be on the safe (and French) side.

Macarons
120 grams egg whites, divided
35 grams sugar
150 grams ground almonds
150 grams powdered sugar
150 grams sugar
50 grams water

1. Preheat the oven to 320ºF. Process the almond meal and the powdered sugar together in a food processor.
2. Whip 60 grams of the egg whites to soft peaks in a standing mixer. Add 35 grams sugar.
3. Bring the sugar and the water just to a boil.
4. Make sure the egg whites are still at soft peaks. (If not, whip them a bit more.) Slowly drizzle in the sugar syrup while the mixer is running at a medium-high speed. Beat until a white shiny meringue forms, about 8 to 10 minutes.
5. Add the other 60 grams of egg whites to the sugar and almond mixture and fold this gently but thoroughly into the meringue.
6. Pipe (using a large circle tip) into 2 to 3 cm circles on parchment or silpat lined cookie sheets and let rest 15 minutes.
7. Bake at 320ºF for 15 to 25 minutes. (I only needed fifteen.)

Baileys Ganache
50 ml heavy cream (a couple tablespoons)
3/4 cup white chocolate chips
40 ml Baileys (about the size of a "nip" bottle)

1. Heat the heavy cream until just about to boil - but don't let it boil.
2. Remove from heat and add white chocolate chips, stirring to melt.
3. Stir in Baileys. Chill until thick.

Now just take two cookies, spoon a dollop of the ganache onto one, press the other on top, and try not to eat them as quickly as you make them.

02 September 2010

Spiced Pumpkin Cupcakes

Pumpkin pie in cupcake form. Warmly spiced and topped with a sweet and cinnamony rum frosting.
My first grade teacher made cupcakes into "cupcake sandwiches" but taking off the bottom and putting it on top, with the icing in the middle. I thought it was an ingenius idea...
...and I still do. A surefire way to get frosting in every bite and not all over your face.

Pumpkin Cupcakes and Spiced Rum Frosting

1 cup pumpkin puree (ours was from a fresh cooked pumpkin but canned would also work)
1/3 cup oil
generous 3/4 cup granulated sugar
1/4 cup soymilk
1 tsp vanilla
1 1/4 cups flour
1/2 tsp baking powder
1/2 tsp baking soda
1 tsp cinnamon
1 tsp pumpkin pie spice blend (or cloves, nutmeg, and ginger)
1/4 tsp salt
1/2 cup chocolate chips

1. Preheat oven to 350ºF. Line muffin tin with cupcake liners or grease.
2. Combine the wet ingredients.
3. Add the dry ingredients, mixing gently to combine, and fold in chocolate chips.
4. Fill muffin cups 1/2 to 3/4 full and bake for 20 to 25 minutes.
5. Let cool completely and then frost with...

Spiced Rum Frosting
1/2 cup butter
2 cups confectioner's sugar
1 tbsp spiced rum (such as Captain Morgan's)
1 tsp cinnamon
soymilk as needed

1. Mix all ingredients together until a firm frosting consistency, adding more confectioner's sugar or soymilk as needed to thicken or thin the frosting.
2. Spoon into a decorating bag and pipe all over the cupcakes!

01 September 2010

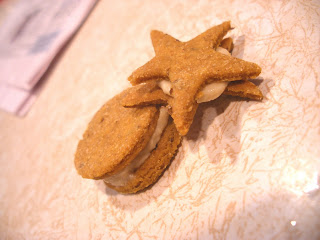
Addictive Crackers

Checking Bittersweet blog as I do daily, I saw the new recipe for vegan cheesy crackers, using a new product: "We Can't Say It's Cheese". I sighed, sure that this was another expensive ingredient I wouldn't find feasible to purchase. Coming home from work that day, however, I found my mother and sister baking potatoes - as a canvas for something they saw at the grocery store: none other than "We Can't Say It's Cheese"! A week later, my sister left for college and half a container of the vegan cheese spread was left...so I decided to finally make this recipe. The crackers turned out to be thoroughly addicting, whether with hummus, cheese, or on their own. Luckily it's a healthy addiction.
"Cheese" Crackers
adapted from Hannah Kaminsky's Bittersweet blog

4 Ounces (Half a Container) “We Can’t Say It’s Cheese”
1 Tablespoon Whole Flax Seeds, Ground
3 Tablespoons Olive Oil
1 Cup White Whole Wheat Flour
1/4 Cup Nutritional Yeast
3/4 Teaspoon Table Salt
1/2 Teaspoon Baking Soda
1/2 Teaspoon Sweet Paprika
1/8 Teaspoon Turmeric
1 Teaspoon Ground Cumin
Pinch Freshly Ground Black Pepper

Preheat your oven to 350 degrees and line two baking sheets with parchment paper.

Mix the “cheese” spread, ground flax seeds, and olive oil thoroughly.

In a separate bowl, combine all of the remaining dry ingredients, until the mixture is homogeneous and the spices are well distributed. Add this whole mixture into the mix of wet ingredients. Mix until the dough comes together. It may take some time, so be patient, and do not add extra liquid to the dough (although I will admit I added a little bit of olive oil). Using your hands may help.

On a lightly floured surface, roll the dough out very thin, to about 1/8th of an inch. Use any cookie cutter you desire. Transfer cut crackers to your prepared baking sheets, and re-roll scraps, cutting more crackers, until the dough is used up. Bake each sheet individually for 10 – 15 minutes, until very so slightly puffy and dry to the touch. They won’t really brown, so don’t panic if they don’t become golden around the edges. Let cool completely on the sheets, and store in air-tight containers at room temperature.

Enjoy with more "cheese" spread, hummus, any other item kicking around your fridge, or alone.

26 August 2010

The Sweet Side of Tea

I am usually opposed to the addition of sweet extras like milk or sugar to hot beverages. Coffee is better black - and to those who disagree, I call you wimps! Tea is best in its virgin state, as it was meant to be enjoyed, chai or other milk teas being the only exceptions.
Well, I stand corrected. I made a batch of biscotti, and thought I'd try one with a hot cup of Mayan Cocoa Spice tea. The teapot whistled, the tea bag steeped, and after anxiously waiting for the tea to reach a comfortable temperature, I took a sip.
The flavors were good, but barely there - they seemed to lack body. So I did what I would under similar circumstances in a dish: add a bit of sugar (agave nectar, in this case) and some almond milk.
The next sip was an entirely different cup of tea. A full, smooth tea with definite chocolate and spice flavors. Perfect accompaniment for these chocolate-chip peanut butter biscotti!
They aren't vegan, as I had a bit of butter and some eggs to use up, but the truth is that I do prefer vegan cooking and baking and will be posting my latest vegan foray soon...

Chocolate-Chip Peanut Butter Biscotti
1/2 cup unsalted butter, at room temperature
2/3 cup granulated sugar
1/2 cup chocolate peanut butter (such as Peanut Butter Co; if you don't have it, mix almost a half cup peanut butter with some sugar and cocoa powder)
3 eggs, at room temperature
2 tsp vanilla extract
2 3/4 Cups all purpose flour
1/2 tsp baking powder
1/4 tsp salt
1 cup peanuts, toasted & roughly chopped
1 cup dark chocolate chips

1. Preheat oven to 350º. Line a cookie sheet with parchment paper.
2. Cream butter and sugar. Add peanut butter and continue to cream all together. Add eggs and vanilla and mix well.
3. Mix all dry ingredients except peanuts and chips and add slowly to wet ingredients.
4. Gently fold in peanuts and chocolate chips.
5. Form dough into two flattened logs and bake for 30-35 minutes, until lightly browned and firm to the touch.
6. Let cool completely - if you don't give the logs enough time, the chocolate chips will smear all over when cutting...not pretty. 7. Cut on a slight diagonal into 1/2-1 inch thick slices. Lie these back down on the cookie sheet and return to oven for another 30-40 minutes.
8. Let cool completely and store in an airtight container for up to two months (or, since these are the perfect mailing cookies, put them in tins and send them to far-away friends!).

24 August 2010

Attack of the Cherry Tomatoes


I went out to the garden, armed with two quart buckets and sandals. We've been getting a drizzly rain almost constantly for the last couple of days, so my usual barefoot approach wasn't going to fly - and never mind the scores of overripe split cherry tomatoes littering the ground! In 5 minutes, I was carrying two overflowing baskets back to the house and pondering what to do with my bounty. I decided to make crepes.
I had a slight problem. I'd used up all the eggs making biscotti (post to come soon!) and my pancake mix didn't thin well. I had, however, picked up a package of corn tortillas yesterday, planning to make a dish with peaches. Seeing as tomatoes and tortillas tend to go well together, it was an easy transition.
This might be the best savoury dish I have ever made, factoring in the fact that it's very quick, easy, and inexpensive. The sweet cherry tomatoes go wonderfully with the salty and tangy feta and the heavy-handed thyme, and the balsamic reduction adds another sweet tang. Mmmm.

Cherry Tomato Tortillas
6 cherry tomatoes per tortilla
small corn tortillas
1 tablespoon herbs de provence (ours had gone missing, so I used a garlic&herb mix, thyme, and...I can't remember!)
1 tablespoon olive oil
1 tablespoon balsamic vinegar per tortilla
1 tablespoon feta per tortilla

1. Heat olive oil in a frypan. Add cherry tomatoes, halved. If their juice is hesitant to come out, squish them a bit with a wooden spoon. Add the herbs de provence.
2. Heat balsamic vinegar in a saucepan. Drain the cherry tomato juice into the balsamic, and boil until it thickens to a sauce consistency.
3. Heat each tortilla in a pan or if all your pans are occupied, in the microwave for 10 seconds on high. Sprinkle the feta on one half of the tortilla, top with the cherry tomatoes, fold over, and drizzle on the balsamic reduction.

Cravings for Caramel Corn


It all started when I stumbled upon a recipe for homemade microwave popcorn. Rather than the $1 per bag most boxed types go for, this used bulk popcorn ($1.39 per pound at Whole Foods) and a brown paper bag. This sounded promising as far as college living goes.
Then, also at Whole Foods, I saw a bag of caramel corn.
I. Love. Caramel popcorn.
I discovered this at a birthday party earlier this year, when I gobbled about a pound while feeling complete bliss all the while. So I now had a great excuse to pop some corn in a brown bag: to destine it for caramel corn.
The slight saltiness adds depth to the sweetness and the airy crunch of the popcorn lightens up the caramel for the perfect snack. It tastes sinful, and in the quantities that I consume it, it most likely is. For normal folks, however, 1/4 cup of kernels should yield a healthy(ish) snack for about 4 people.
Caramel Corn
1/4 cup popcorn kernels
1 paper bag
1/2 cup brown sugar
1/8 cup water
2 tablespoons butter
1/2 cup heavy cream
1 tsp vanilla
1/2 tsp salt
1/4 cup peanuts (optional)

Preheat oven to 250ºF.
1. Place popcorn kernels in bag. Fold end of bag over three times and place fold side down. Microwave on high for 3 to 4 minutes.
2. Put brown sugar in a heavy saucepan over medium-high heat and pour water on top. Swirl pan to dissolve sugar.
3. Set to high and boil, covered, for two minutes.
4. Uncover and, stirring occasionally, let boil until browner around the edge of the pan and thicker.
5. Remove from heat, add butter and stir in, then add cream, vanilla, and salt.
6. Spread half the popcorn batch onto a cookie sheet lined with parchment paper. Pour half the caramel sauce over the popcorn and add half the peanuts. Toss to coat.
7. Bake for 45 minutes to an hour, shaking the pan every 15 minutes. When done, the popcorn will be crisp and not at all sticky.
8. Store in an airtight container and refrain from constant consumption.

21 August 2010

Plaid

I saw it and had to try it: plaid as a new baking trend. Whether in icing or cut out of fruit leathers, it was popping up everywhere and I for one love it. So combining my love for "fancy" cookies with this great decorating idea, I ended up with Plaid Blueberry Linzer Tarts. Okay, they are made with a sugar cookie recipe which is nothing like a true linzer. I take creative license. I apologize for their lack of veganness, but you could solve that with vegan substitutes. Here you go.
Blueberry Linzer Tarts
1 cup butter
1 cup sugar
1 egg
1 tsp vanilla
3 cups flour
2 teaspoon baking powder
1 cup blueberry jam

1 circle cookie cutter (or drinking glass)
1 tiny circle cutter (or bottle cap)

1. Cream butter and sugar.
2. Add egg and vanilla.
3. Add flour and baking powder.
4. Chill.
5. Roll out and cut an equal number of circles and "donut" shapes.
6. Bake for 6 to 7 minutes at 400ºF.
7. Let cool, then spoon about 1/2-1 teaspoon of blueberry jam onto solid circle cookies, then sandwich a "donut" cookie on top.
Plaid Decoration
1/2 cup white chocolate chips
few drops blue food coloring
1/2 cup semisweet chocolate chips
2 teaspoons butter

1. Melt the white chocolate chips with 1 teaspoon butter, and add the blue coloring.
2. Pipe (I just used a plastic "snack bag" with a hole cup in the corner) the blue "icing" on the cookies: two blue stripes up one side, and a perpendicular blue stripe across the bottom.
3. Melt the semisweet chocolate chips with 1 teaspoon butter. Spoon into bag for piping.
4. Pipe two chocolate stripes on either side of the blue stripes on the side and the blue stripe across the bottom, and two chocolate stripes on the top of the cookie parallel to the bottom blue stripe.
5. Or just ignore my attempt to create plaid and go for it yourself. I tried to putting opposite-color dots on intersections, but the "icing" just wasn't the correct texture for that to work.
Enjoy!

20 August 2010

Time Flies

Wow, I've let two weeks pass without a post...and it's not like I haven't been in the kitchen. My culinary exploits, however, have veered towards the less photogenic and savoury, with Moroccan stew, tortilla española, salsa, and wheatberry salad. I have had a couple of dinner parties - one a cheese sampler, the other with pesto pizza and veggies from the garden. I've had a friend come and stay and spent time with others, but college is looming on the horizon for all of us and yet again comes the leaving and the goodbyes. During the summer I always have the time to bake, but never enough people around to eat the results - and when my dormmates are getting hungry, I'll probably be too busy to play around in my kitchenette! But I'll do my best to bake something pretty, and soon.

06 August 2010

Summer Cinnamon Rolls


"And they even have zucchini in them!" ...cue dumbfounded looks. Technically, I should have said summer squash - that would explain the self-evident lack of green going on. I made these cinnamon rolls for a friend's fundraiser, and broke my own rule of always trying everything before letting other people at it. My nerves rolled into full gear as I saw people carrying around and munching my little contributions, but I saw only empty wrappers being thrown away so I supposed they were good. I tried one after the event and my assumption was correct: these are great. I haven't had a technical cinnamon bun for a while, so these might not be the most hearken-back-to-your-childhood rolls, but they might just establish a new standard. A soft and light bread wrapped around cinnamon sugar is slightly sweet enough on its own, and once it gets drizzled with a cinnamon sugar icing, the dessert threshold is crossed. A bite of these first hits you with a sweet rush, then a full-bodied cinnamonness, all mellowed pleasantly by the spiral of brioche-like bread.
So...where's the zucchini? Well, I loved Hannah Kaminsky's Zucchini Babka recipe, but I suspected that green flecks wouldn't look so pretty in cinnamon rolls. Luckily our yellow summer squash is overly abundant, and although the larger seeds make for more tedious and vigilant shredding the effect was brilliant: the vegetable component became invisible in both taste and sight, it's presence only noted for its contribution to the incredibly lovely texture of the bread...I can only compare it to clouds.
Please, especially if you are a gardener or know one overrun with yellow summer squash, make these - and trust me, the recipe is easier than it looks! Although having a free and abundant supply of squash isn't necessary - this bread recipe is so good, I'm going to buy squash all winter long to make it.
Summer Cinnamon Rolls
Hannah Kaminsky's Zucchini Babka recipe
with yellow summer squash substituted for the zucchini and cinnamon added with the flour

Proceed as directed until you come to the rolling out part. Grease a muffin pan. Divide the dough into halves, and split one half. Roll out that quarter of dough. Spread melted margarine onto the thinly-rolled dough and sprinkle generously with cinnamon sugar. Roll up and cut into six even pieces; fit into muffin tin. Repeat with the other quarter.
Use the remaining half for even more cinnamon rolls, or make a loaf of bread! I made cinnamon-date bread...because I like dates more than raisins, and because different is good.
Regarding the icing, just mix lots of powdered sugar with a little soymilk and a little cinnamon until you have a thick icing - just so that it barely drizzles from a spoon. Make sure your rolls have cooled off fully before icing!!
Delicious...and you can decide whether or not you reveal the secret garden ingredient.

03 August 2010

Blackberry Pie


Last year I found out about a well-kept secret blackberry patch nearby, and yesterday my mother and I headed up, armed with a couple of pint baskets, to pick. At first glance, the harvest looked slim; but we knew that stick-to-it-ive-ness pays off when it comes to small berries, so we kept at it, foraying deeper and deeper into the bramble. We ended up with legs and arms covered in scratches, but also with 3 and a half pints of blackberries - definitely enough for blackberry pie.
I don't think I'd ever had blackberry pie. Like having enough tomatoes to make ketchup, it is a rare occurrence that one have sufficient blackberries for a pie. My mother convinced me to make a mini-sized pie, so as to leave enough berries for cereal. It's probably for the best, because I would have eaten an entire whole one. It's that good.
(Small) Blackberry Pie

1 cup flour
1/3 cup plus 1 tablespoon shortening
1-3 tablespoons water

2-3 cups fresh blackberries
1/3 cup sugar
1/4 cup flour

Cut the shortening into the flour until the mixture resembles coarse sand. Add enough water to make the dough pull together into a ball. Chill.

Preheat the oven to 400ºF. Gently mix the flour, sugar, and blackberries together. Take the crust out of the refrigerator and divide into halves. Roll each half into a large circle, for the top and bottom crusts. (Or if your dough is especially uncooperative as mine was, just make a patchwork bottom and cut-outs for the top...) Assemble the pie - remember that the blackberries will cook down, so have a generous heap of filling.

Bake for 35-45 minutes, until the crust is lightly browned and the berries are bubbling.

Let cool - this is the hardest part. I broke down and cut it while still warm, at that perfect-with-ice-cream temperature...Enjoy!

02 August 2010

Enough Tomatoes for Homemade Ketchup

During the last couple of weeks, I have driven about a thousand miles with some of my best friends and my genius sister, I've read a book ("Monsignor Quixote", definitely recommended!), and meanwhile, the front yard garden has grown. The butternut squash has invaded the grass, and the zucchini, and the yellow squash, and the cucumbers, and I'm hoping that it doesn't end up strangling our two beautiful cantaloupes.
We haven't calculated the scientific growth rate of zucchinis, but we have learned that it is something incredibly fast. One escaped us the other day, and before we knew it we had a monster zucchini on our hands...
About a billion times the size of a quarter. But fear not...he's friendly.
The best thing about such a successful garden is the quantity of vegetables. While tomatoes at the grocery store have prices that seem to go up each day, we have enough of the gorgeous red fruit to make ketchup...tomato sauce...salsa...and use in salads, grilled cheeses, or salted!
I had never made ketchup before, so I loosely followed this recipe: sautée half an onion, a hot pepper, and two cloves of garlic, all diced finely, in olive oil for five minutes. Add a bay leaf, cinnamon stick, a couple teaspoons of mustard seed and black pepper, a couple whole cloves, and a pinch or two of allspice. (I added a generous amount of chopped sage, one of our garden's success stories.) Then add four large, roughly chopped tomatoes. Stir, bring to a boil, and then simmer for 45 minutes. Blend in a food processor, return to heat, add 1/4 cup vinegar and a couple tablespoons of brown sugar, and then let simmer until reduced to your ideal ketchup consistency.
Let cool, put in glass jars, and keep refrigerated for up to 3 weeks. I never knew making ketchup was so easy!!